Working with Projects
1. Project View
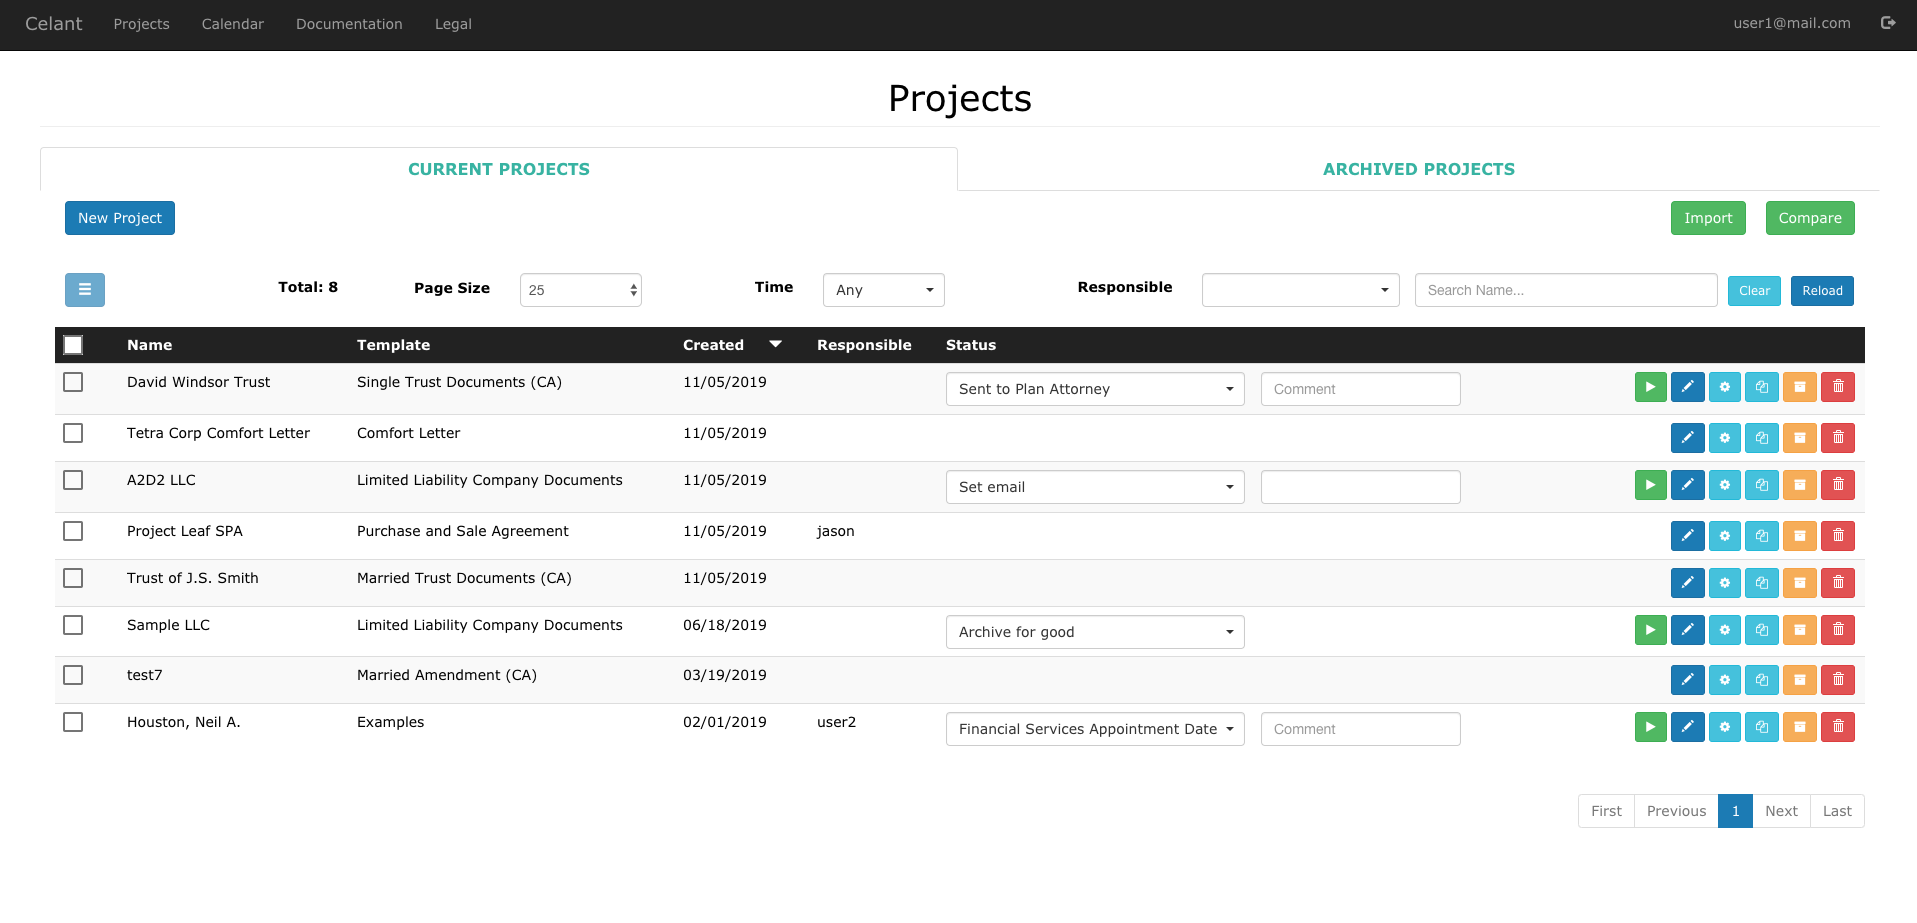
Below is the Project View, one of the first screens a User will see after logging in and having accepted any terms and conditions to use the app. At the top, you will see the navigation bar with 5 important links:
- Projects
- Documentation
- Calendar
- Profile
- Logout
You can always return to the project list view by clicking "Projects" in the menu bar. If you need help, click on "Documentation" to visit this Documentation page. The Calendar is the place where the User will be able to view various appointments and due dates in a calendar format. The view can be customized for each user, depending on their needs. You can also visit your profile page (where you can change your password, etc.) by clicking on your login name in the upper right corner. There is also a logout button, which will log you out.
On the main page, you will see two tabs: Current Projects and Archived Projects. If you have created (authored) the project, or another user shared a project with you, it will be listed under Current Projects. Any project that you designate as Archived will be listed under Archived Projects. The Owner of the project has the authority to stop sharing its project at any time for any reason.
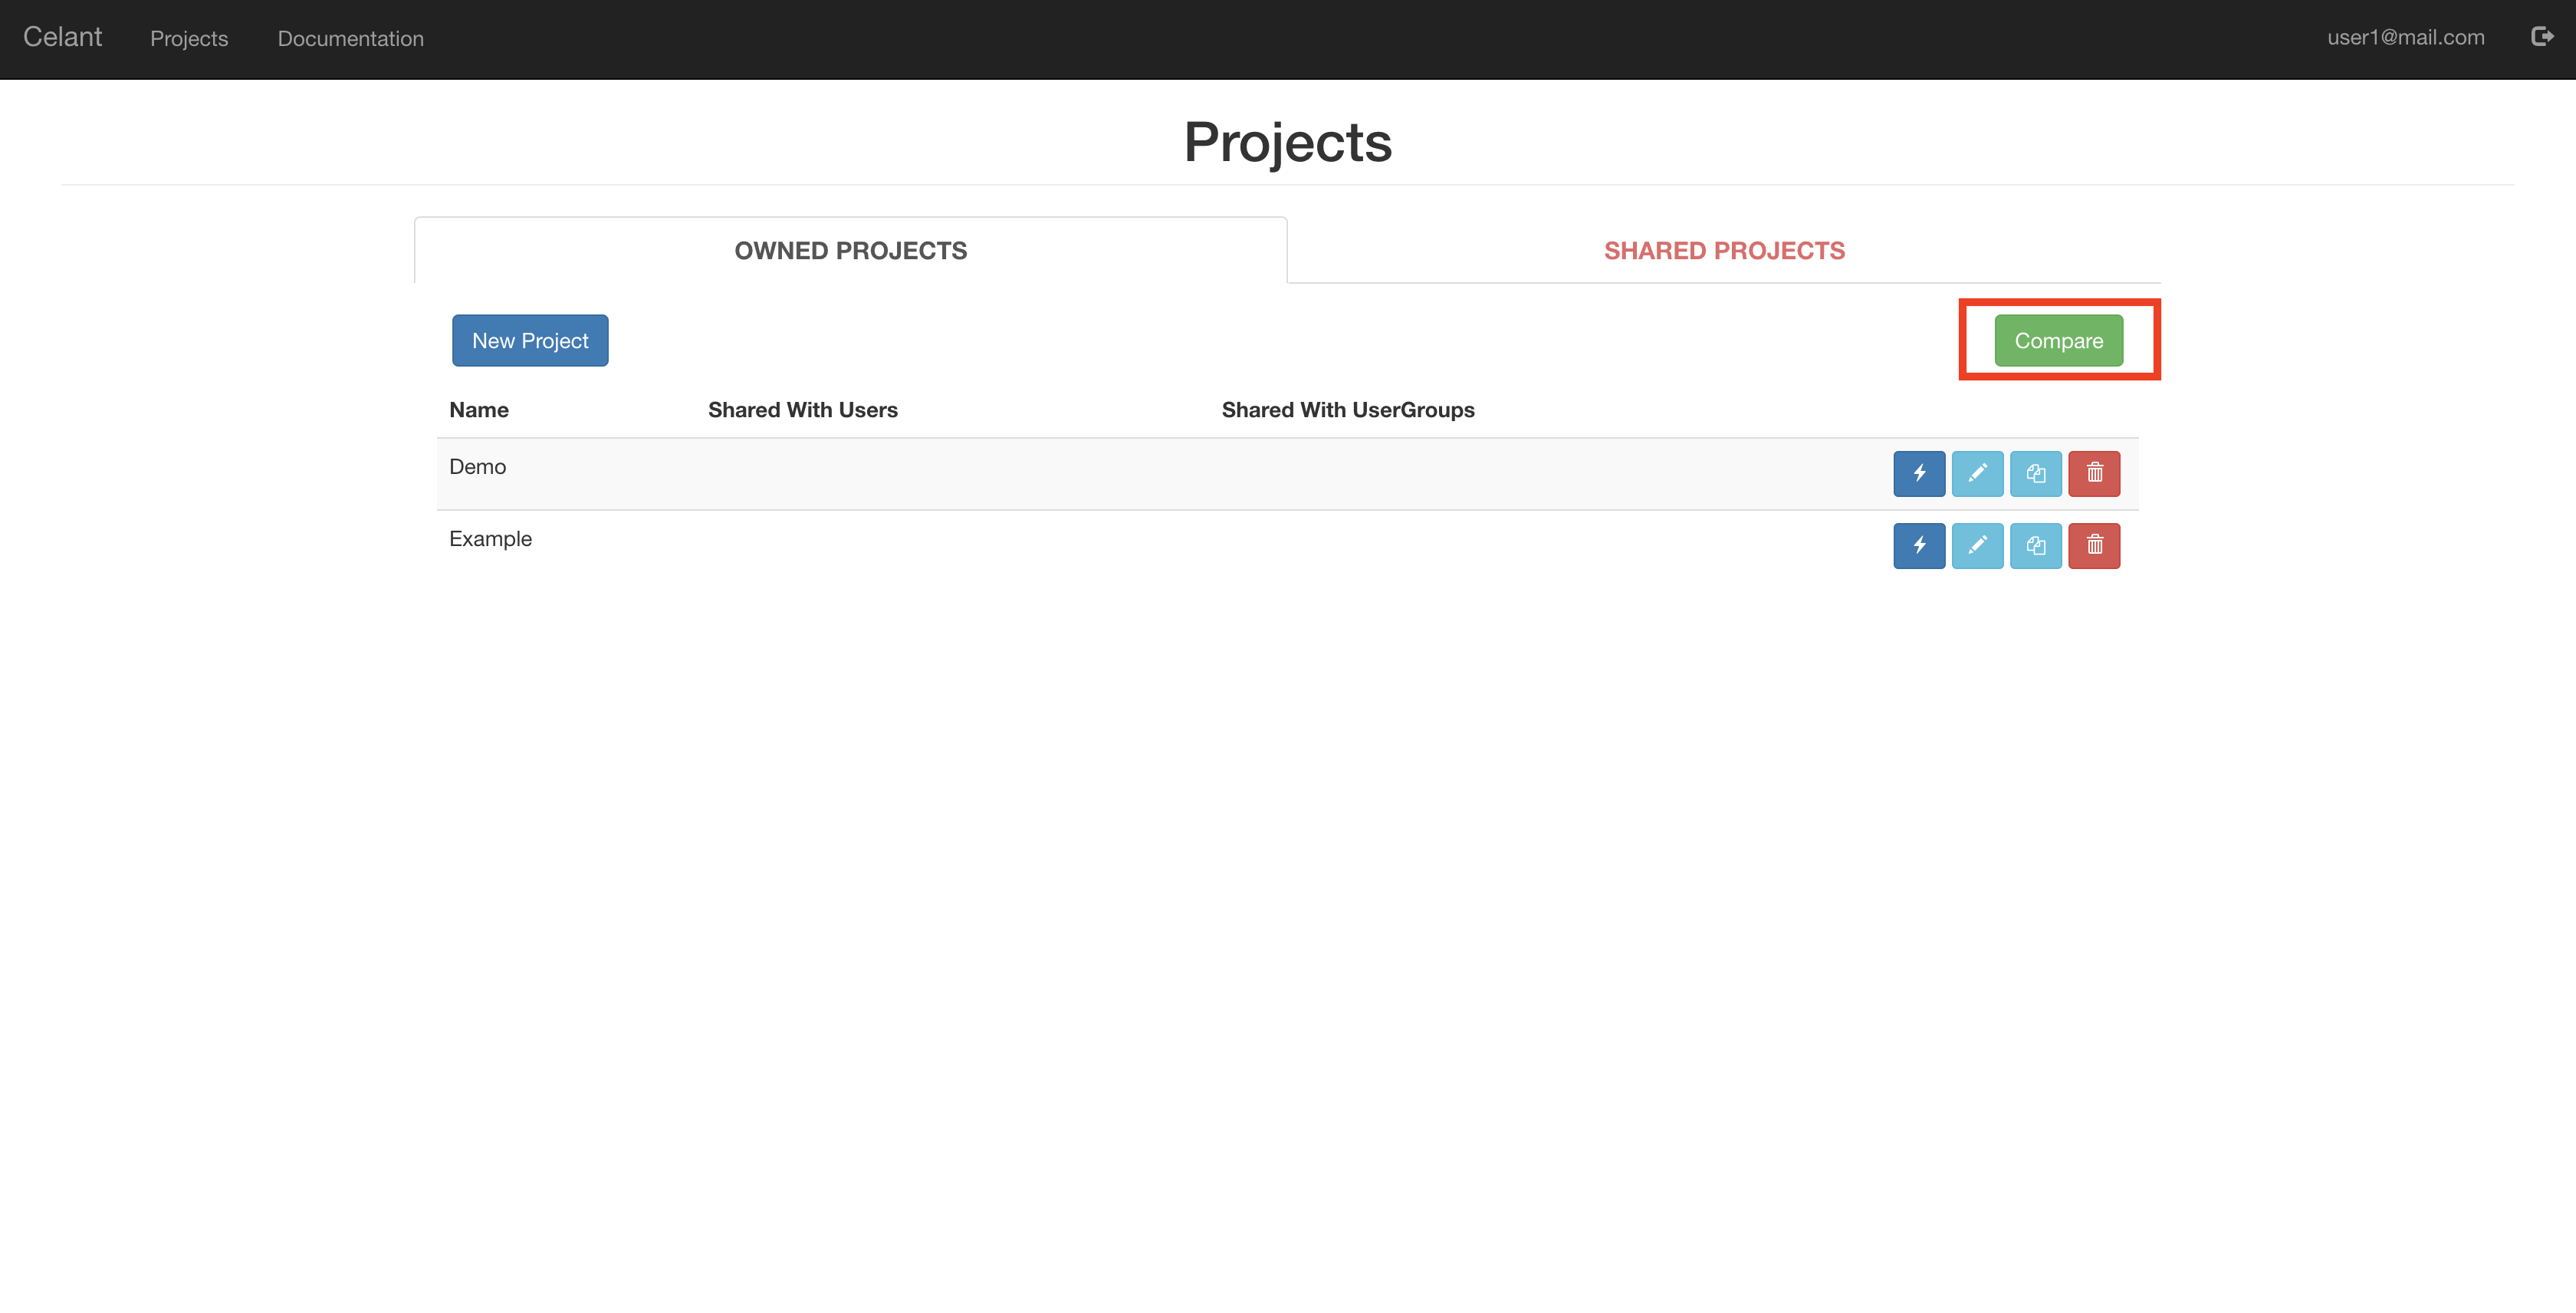
On each tab, you will see all of the Projects that you are working on, or have worked on, respectively. The green play button is a shortcut button that exists when workflow automation has been enabled in a project. The pencil icon permits you to edit the Project; the gear icon permits you to see the properties of the Project; the duplication icon allows you to copy the Project; the yellow file box icon allows you to archive the project, so that it will appear under Archived tab; and the red trash button allows you to delete the Project (if proper permissions have been granted).
The New Project button at the top allows you to create new Projects. You must have permissions to Project Templates (from Authors or Admins) in order to create your project with such Project Templates.
2. Project Editor
The Project Editor is the place where the User will spend the most time creating documents. The Editor is divided into three sections or panels. The left panel is where the User inputs data. Each item that is "selected" by mouse will be highlighted in blue glow, indicating that it is the selected item. The middle panel shows the actual underlying document, and will show how the document changed as a reaction to User's input on the left panel. The right panel is subdivided into five tabs: freestyle editing; help and workflow; versioning and compare; calendar; and files. They are more fully described below.
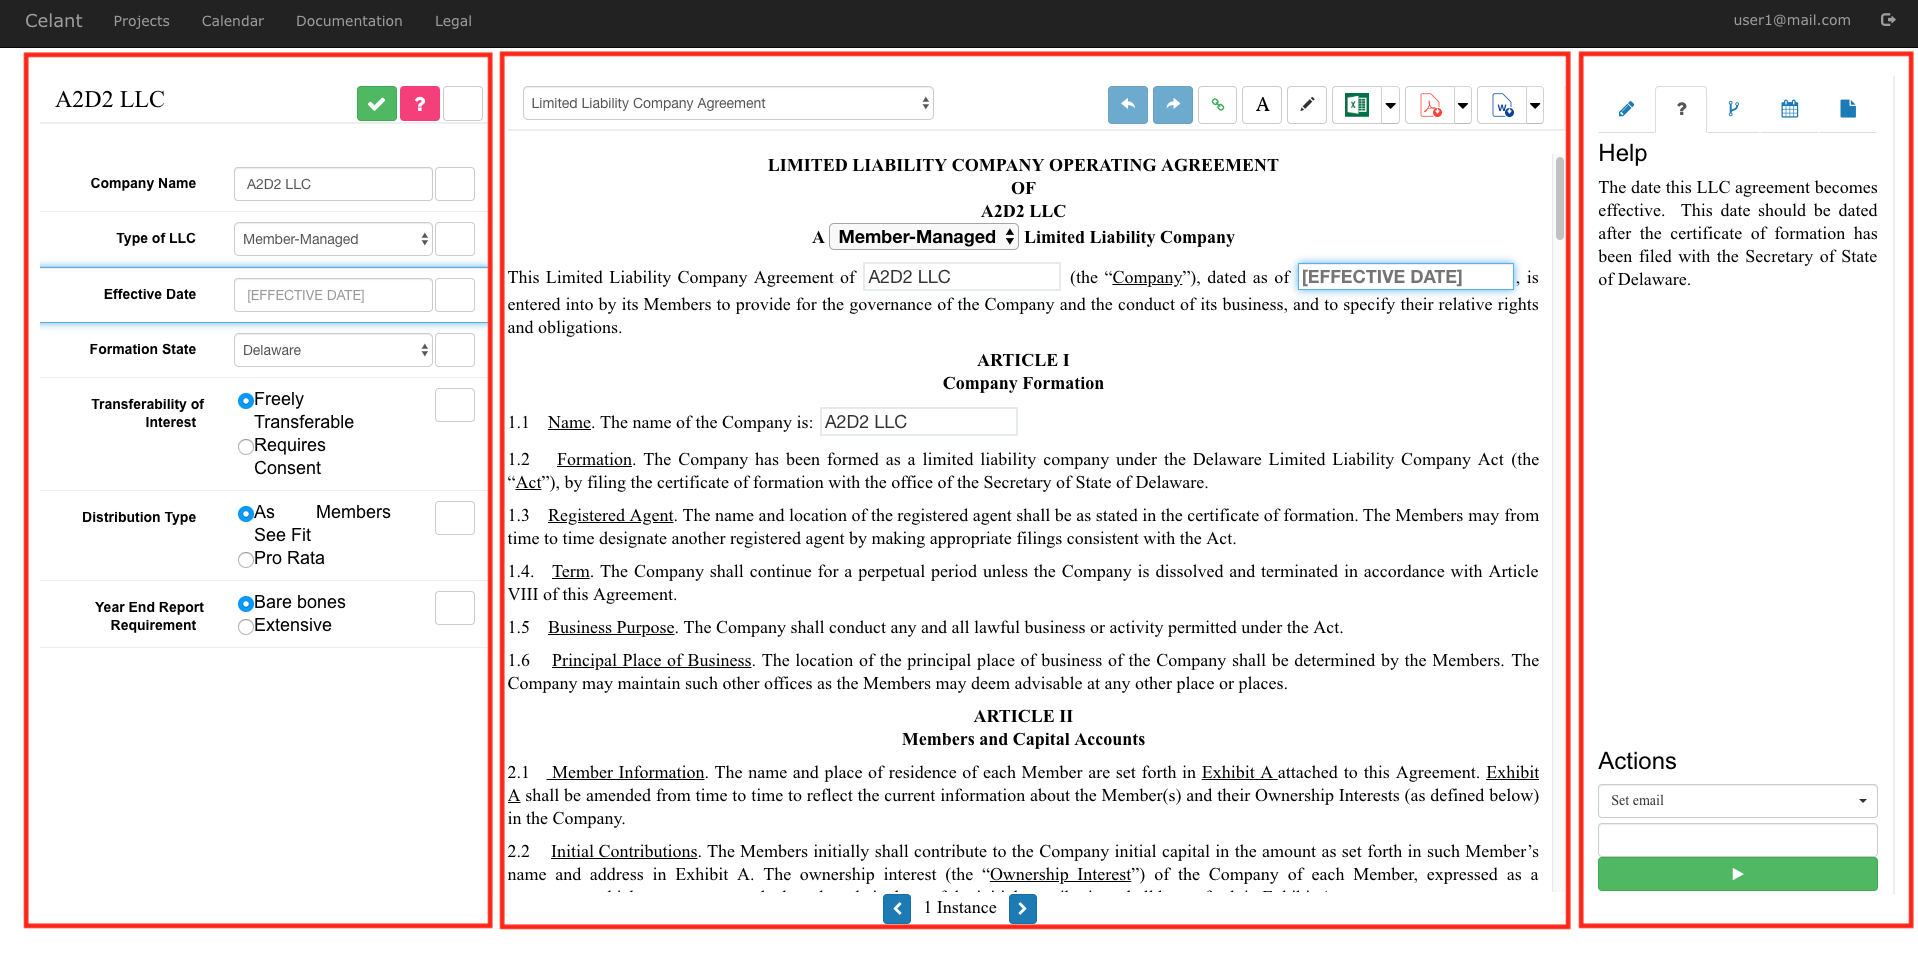
Next, let us take a look at the top menu bar in the below screenshot, where most of the important features are presented in red boxes. The left most red box represents the name of the Project, in this case called "A2D2 LLC". Immediately to the right of that are the three state buttons. Currently, they are all turned on, so all of the States ('Confirmed' as represented by green check, 'Uncertain' as represented by red question mark, and 'Neutral' as represented by blank box) are visible. However, if you are coming near the end of the transaction cycle, you might want to review all of the Confirmed items or just see "what's left?" by only showing Uncertain and Neutral items.
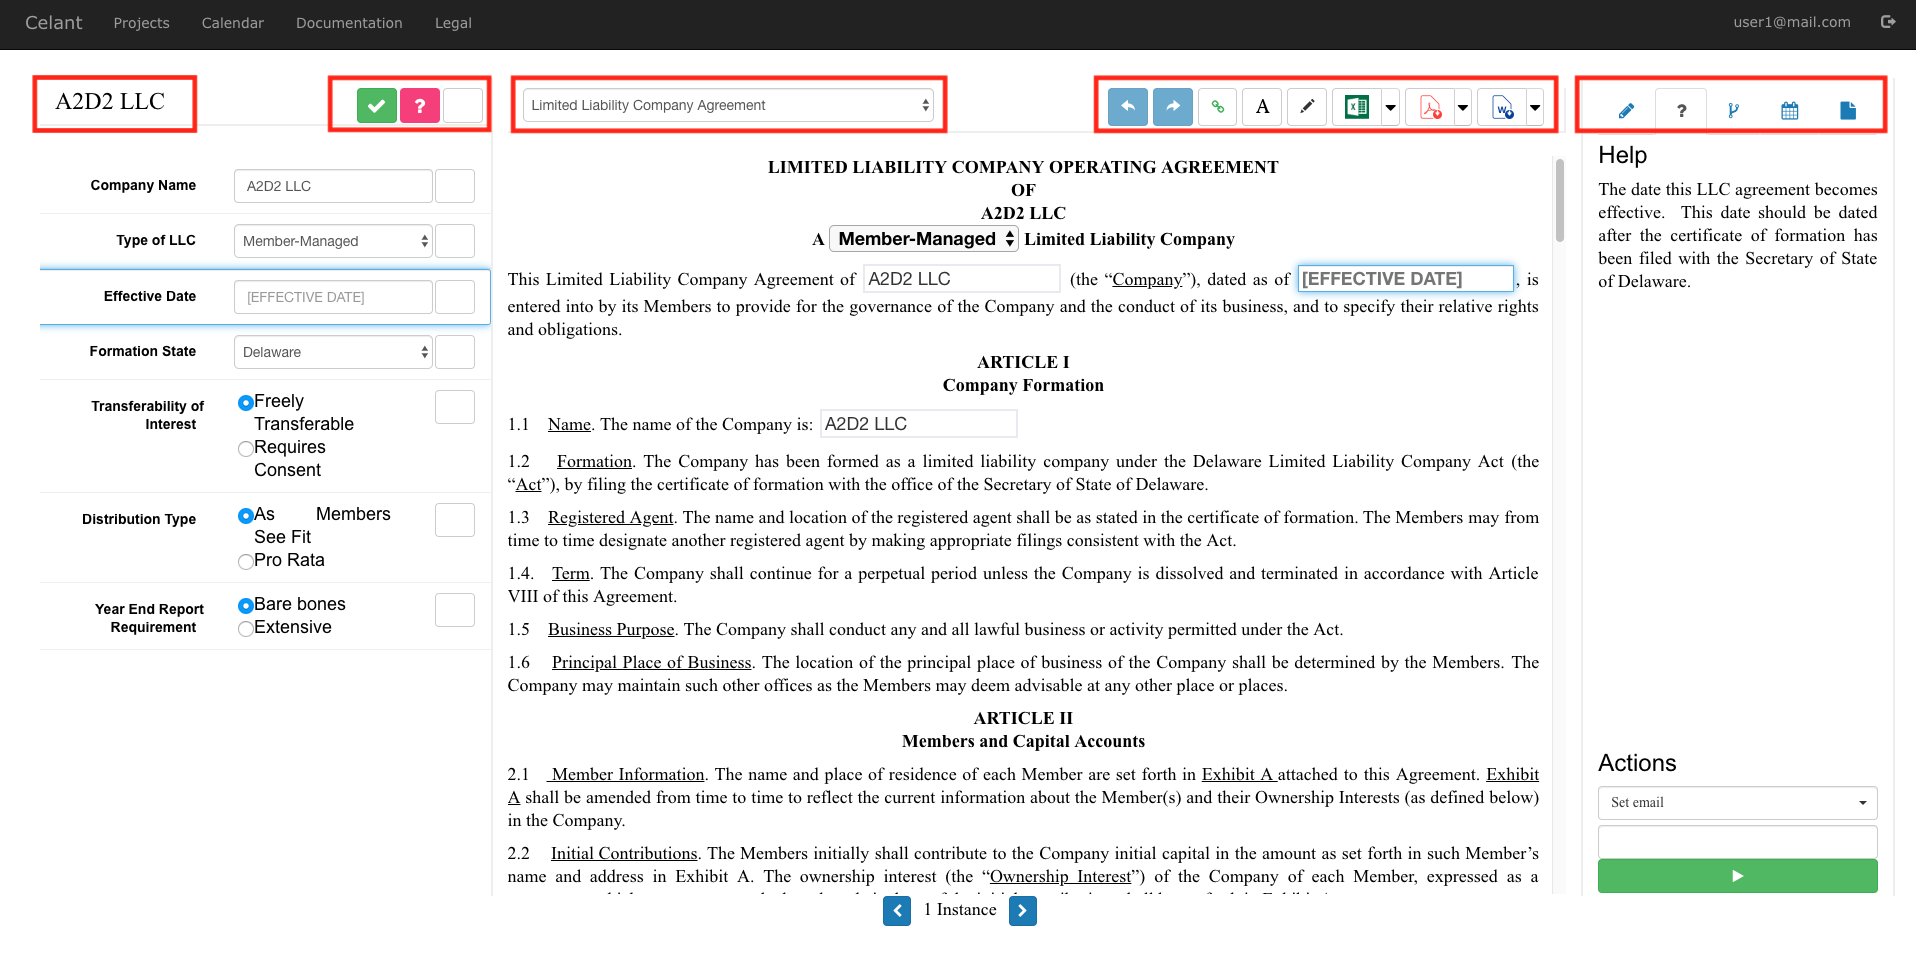
In the middle, there is a Dropdown menu where different Documents within a Project can be selected, currently showing "Limited Liability Company Agreement". You use this dropdown to jump to different Documents. All of the Documents within a Project share the variables, so inputting data into one Document will populate the data into all of the Documents within the Project. A popular way to simplify the input process is to develop a customized "Summary Terms" Document that includes all of the relevant and important information for the transaction. After that information is in, the User can go into each of the Documents to further customize concepts that are present only within such Document.
 To the right of the Document Dropdown menu, there are Undo and Redo buttons. The undo history is to the project's creation, so you can undo until the very first change.
 The Green chain-link enables or disables the Smart Scrolling system. When the Smart Scrolling is enabled, any clicks on the left panel item will scroll the middle screen to show the first instance of that variable in the underlying document. Similarly, if an item on the middle panel is clicked, the left panel will scroll, to show that item to the user. They will both be highlighted in blue glow, so that it is easy to see how they are connected.
 The next button is the "A" button with a toggleable strike-through. This button toggles redline vs. clean mode. The redline mode shows how the Document has changed from the "Default" settings that the Author/Admin has designated, by showing deletions in red strikethroughs and insertions in blue underlined text. The admin, using the Formatting Template, has the ability to change the stylistic display into actual "track changes" feature in Microsoft Word. It should be noted that, when you first load the Document, when all of the values would have been set with Default values, no redlining will appear, because since all of the values are the same as Default values, there are no differences to show. In the Clean mode, the changes are not shown, and the document is shown in the current 'as is' state.
 The next button is a "pencil" button that allows the user to make Freestyle Edits. Freestyle editing allows the user to change any portion of the document, permitting the user to accommodate one-off requests to modify the language of the template.
The next three buttons are the Conversion buttons. The app converts the document either into MS Excel XLSX, Adobe PDF or MS Word DOCX. There's also a drop-down arrow next to XLSX, PDF and MS Word Conversion buttons. They allow the user to import project data, convert signature pages only, download the entire set of documents as a single zip file, or create closing set binders.
3. Flex Panel on the Right
The Right Panel contains several functionalities, as shown by their 5 tabs with icons. They provide the following functionalities:
 The pencil icon tab is to utilize Freestyle Editing. Freestyle Editing allows the user to delete or add text to a non-input field area in the document. This pane will contain all of the current document's freestyle edits and other document's edits as well.
 The question mark icon tab contains the help text that is associated with the item at issue. It can also display selection rates (e.g. 25% of Users selected Option A), if chosen to be displayed by Admin. If the project contains workflow automation, it will appear at the bottom.
 The forking icon tab contains information related to versioning and comparing. Due to the continuously saving nature of web applications, our versioning system is designed as a snapshot (which sets the values in stone), because it becomes hard to pinpoint a specific state, in an ever-saving document, since the only way to 'preserve' that save point is to stop making changes on it, which might happen by accident. So we permit the user to actively freeze the information in the form of snapshots, which ultimately achieves the same result. Within this pane, you can also compare versions textually (redlines) or topically (issues list).
 The calendar icon tab contains the events, which can be subdivided into three categories: appointments, notes and logs. An appointment refers to an upcoming (not past) scheduled event in the calendar, and they are listed first. An appointment can be made from this pane as well. Note refers to any note the user would want to leave within the project, without affecting any text within the project. Finally, log records all of the relevant events accruing to the project. Any text put into the "comment" box will be stored as a log event, and will not be deletable.
 The file icon tab contains any files the user has uploaded. The file size limit is set by the Admin and by default, it is set to 2MB, which can be increased as appropriate. Certain workflow actions permit the user to save the documents directly onto this pane.
4. Compare Versions
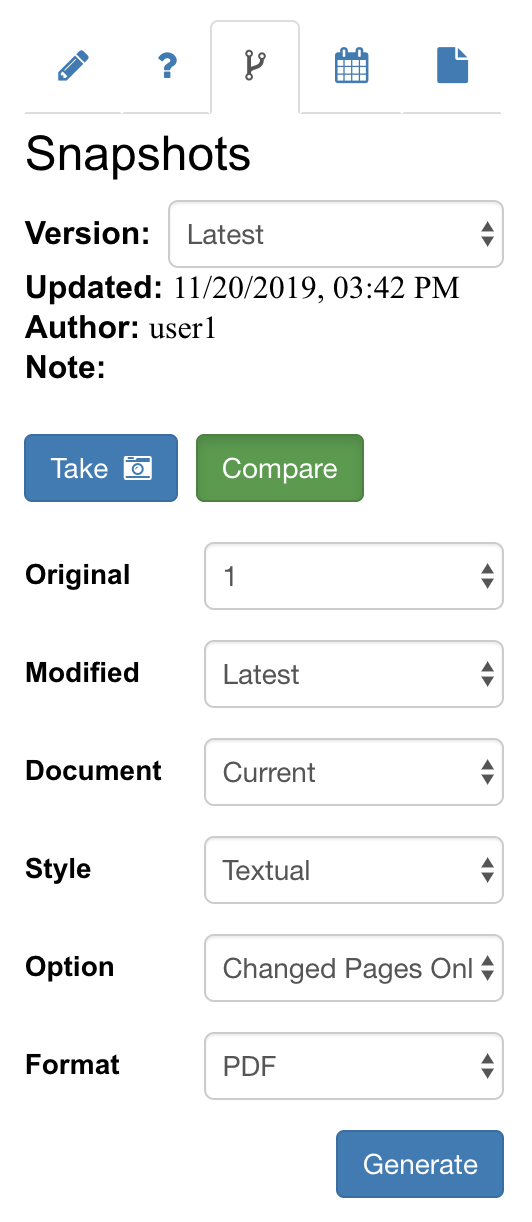
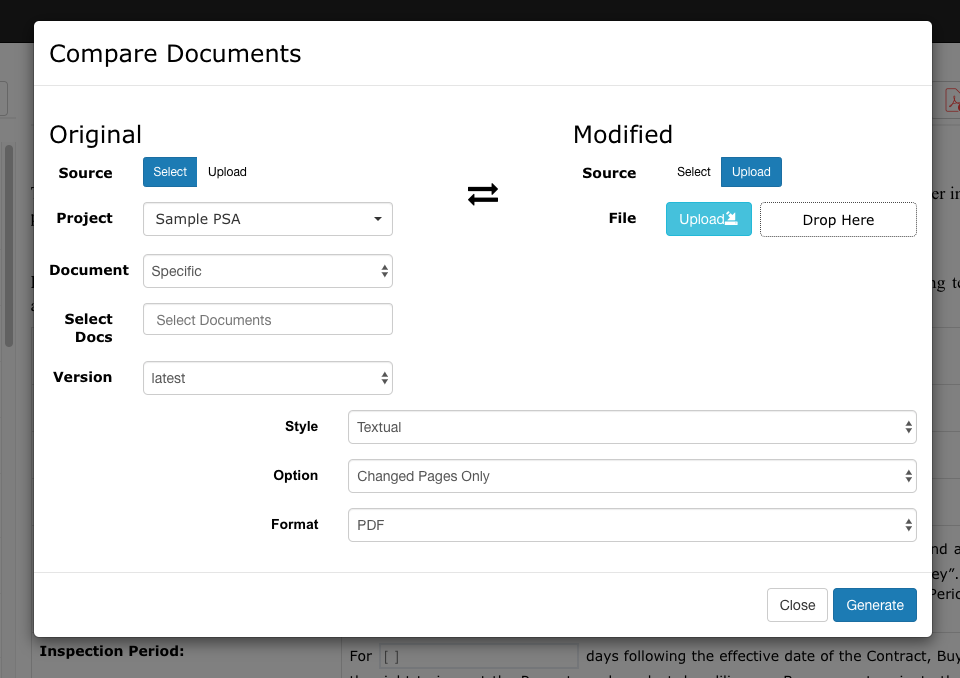
The application includes ability to compare different versions of the documents within a project, either in a topical format (issues list) or textual format (redlines). The left screenshot shows the user interface that shows up upon pressing "Compare" in the right panel under the "Versioning" tab. In order to successfully compare versions, there should be at least one snapshot created.
Original refers to the original document to be compared against, and you must select a version.
Modified refers to the modified document, and you must select a version number as well.
Document refers to the coverage. You can select either the current selected document, or all documents within the Project.
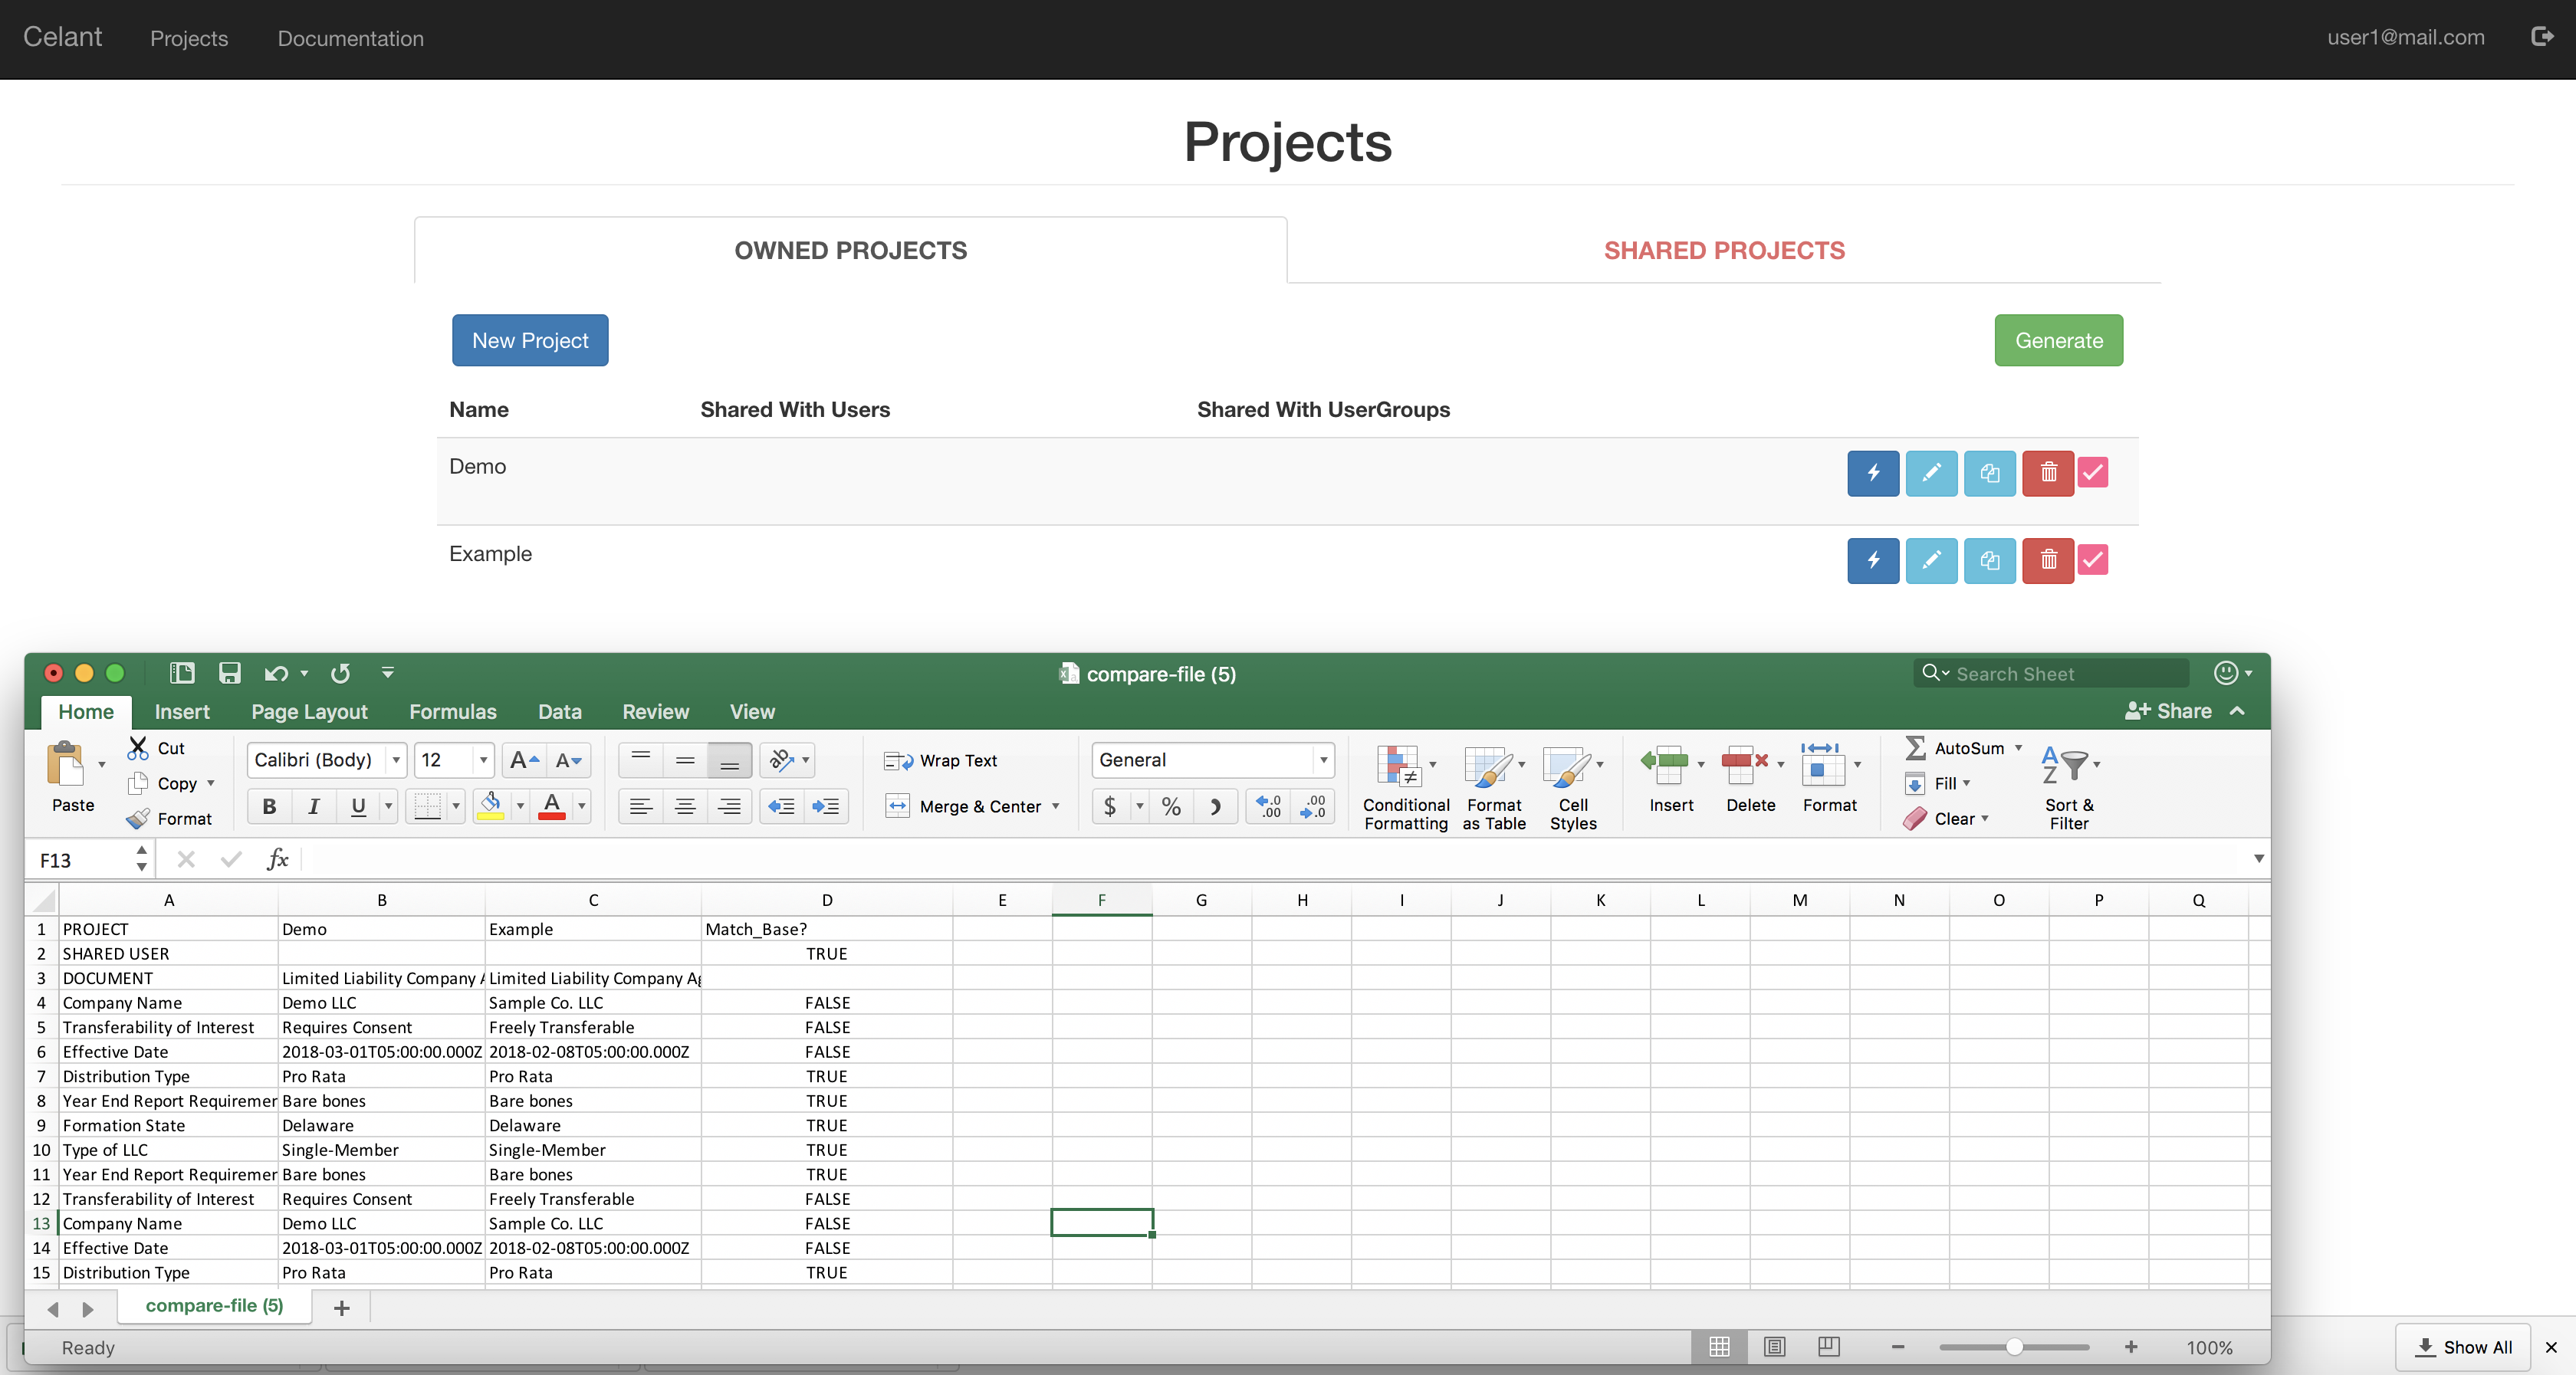
Style has two choices: Topical or Textual. Topical comparison refers to differences being displayed on a per topic or variable basis, displaying the changes in a tabular format, in either Excel or CSV. Textual comparison refers to the underlying text differences, and the differences are displayed as a redline comparing the document(s).
Option changes depending on the Style, but generally speaking, they refer to whether you want to see the whole comparison, or just the changed parts.
If Topical, you can select Differences Only, which will only display the differences between the version (where Match? column is equal to FALSE). Otherwise, please select "Full" to show all topics (variables), even if they haven't changed between the versions.
If Textual, you can select Changed Pages Only, which will only show the pages containing changes, i.e. redlined text. If this Option is selected, only possible output format is PDF (DOCX is not supported). To see the entire comparison document, please select "All" and all of the pages within the document(s) will be provided.
Format refers to the output format. If Topical style was chosen, the output formats are Excel XLSX or CSV files. If Textual style was chosen, the output formats are PDF or DOCX. However, if Changed Pages option was selected, only PDF format is possible.
5. Compare Against DOCX
If the counterparty does not employ our system, they will often send the revised documment in a MS Word DOCX format. For these occasions, the application is also able to compare the project against an uploaded DOCX. It is also possible to compare documents (of any version) within another Project or compare two DOCX documents. These options are available under the Advanced Compare function (the Triple Dots).
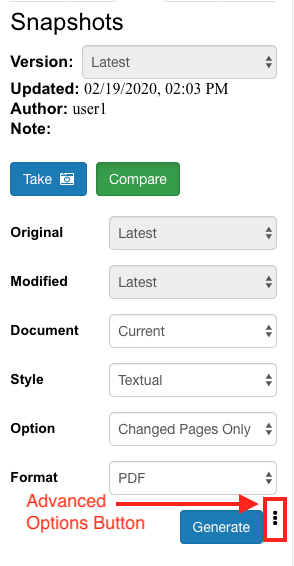
Next, a new menu appears, which allows you to select project vs. DOCX, or DOCX vs DOCX. For DOCX documents, the user is required to upload the document, either by selecting the document or drag-and-dropping. For user projects, similar options apply (such as ability to select textual vs. topical comparison, and the output format) as the normal version comparison panel. The main difference between the normal version comparison right panel vs. the Advanced Compare is that (i) you are permitted to compare against DOCX and (ii) you can compare other projects within the app (not just the project currently being viewed and edited)
DOCX vs. DOCX Comparison?!
Yup, our application contains a stand-alone comparison engine that can compare Word documents and output the redline format, in either DOCX or PDF. We can even do the "changed pages only" mode (in PDF). No need to pay separately for a comparison program!


 To the right of the Document Dropdown menu, there are Undo and Redo buttons. The undo history is to the project's creation, so you can undo until the very first change.
 The Green chain-link enables or disables the Smart Scrolling system. When the Smart Scrolling is enabled, any clicks on the left panel item will scroll the middle screen to show the first instance of that variable in the underlying document. Similarly, if an item on the middle panel is clicked, the left panel will scroll, to show that item to the user. They will both be highlighted in blue glow, so that it is easy to see how they are connected.
  The next button is the "A" button with a toggleable strike-through. This button toggles redline vs. clean mode. The redline mode shows how the Document has changed from the "Default" settings that the Author/Admin has designated, by showing deletions in red strikethroughs and insertions in blue underlined text. The admin, using the Formatting Template, has the ability to change the stylistic display into actual "track changes" feature in Microsoft Word. It should be noted that, when you first load the Document, when all of the values would have been set with Default values, no redlining will appear, because since all of the values are the same as Default values, there are no differences to show. In the Clean mode, the changes are not shown, and the document is shown in the current 'as is' state.
  The next button is a "pencil" button that allows the user to make Freestyle Edits. Freestyle editing allows the user to change any portion of the document, permitting the user to accommodate one-off requests to modify the language of the template.
  The pencil icon tab is to utilize Freestyle Editing. Freestyle Editing allows the user to delete or add text to a non-input field area in the document. This pane will contain all of the current document's freestyle edits and other document's edits as well.
  The question mark icon tab contains the help text that is associated with the item at issue. It can also display selection rates (e.g. 25% of Users selected Option A), if chosen to be displayed by Admin. If the project contains workflow automation, it will appear at the bottom.
  The forking icon tab contains information related to versioning and comparing. Due to the continuously saving nature of web applications, our versioning system is designed as a snapshot (which sets the values in stone), because it becomes hard to pinpoint a specific state, in an ever-saving document, since the only way to 'preserve' that save point is to stop making changes on it, which might happen by accident. So we permit the user to actively freeze the information in the form of snapshots, which ultimately achieves the same result. Within this pane, you can also compare versions textually (redlines) or topically (issues list).
  The calendar icon tab contains the events, which can be subdivided into three categories: appointments, notes and logs. An appointment refers to an upcoming (not past) scheduled event in the calendar, and they are listed first. An appointment can be made from this pane as well. Note refers to any note the user would want to leave within the project, without affecting any text within the project. Finally, log records all of the relevant events accruing to the project. Any text put into the "comment" box will be stored as a log event, and will not be deletable.
  The file icon tab contains any files the user has uploaded. The file size limit is set by the Admin and by default, it is set to 2MB, which can be increased as appropriate. Certain workflow actions permit the user to save the documents directly onto this pane.

